Ages ago, we had a post on InGoal Mag about companies starting to experiment with using vinyl applications to "paint" goalie masks. I was pretty excited about that possibility because I've never been sold on shelling out $500 for the paint job of my dreams.
But it wasn't really a mainstream thing. Just a couple of sign-making companies in Quebec dabbling in it. Not the sort of thing you can just click "Buy" and have shipped to your door.
Then a couple of weeks ago, IGM again reported on Head Strong Grafx, who finally has come out with vinyl graphics on a turnkey basis. They have about 20 designs and you can pick your color, or for an upcharge, you can get metallic or other finishes.
But really, I was left with a LOT of questions about what I was going to get from them. In fact, it took me a while to even figure out that the application didn't cover the whole mask. I'm a little slow.
Anyway, I figured for $25, it was worth a shot, so I ordered a set of flames in white to go on my solid black Hackva.
It took them about a week to get here and what I got was 3 smaller flame graphics and 2 large ones cut out from a larger sheet. The graphic is sandwiched between a tacky translucent backing and a stiffer, non-sticky blue backing.
The instructions for application are
on their web site, but here's my much more detailed take, with some of my own experiences thrown in.
What you need:
Bowl of soapy water
Soft cloth to apply soapy water
Sharp Exacto knife
Credit card, driver's license, etc. for squeegeeing the graphic smooth
- Take your cage off and then clean your mask with Windex or something similar. If you need to touch up paint or anything, I'd do it at this point.
- Place the graphics on the mask and see where you might want to put them. Keep in mind that it's exponentially easier to put the graphics on a flat surface or where there's only one curve. When the same piece of the graphic has to curve two ways, like on the side of your chin, where it's curving forward and down, it's very difficult to avoid wrinkles. More on that later.
- Peel BLUE backing layer away so that the graphic is stuck to the translucent layer. (Aside: I've spent 35 years using bandaids, so when I saw a flap where the translucent layer overlaps itself, I assumed that's where I'm supposed to peel. I WAS WRONG. DON'T DO THAT. Ruined one of the big flame graphics doing that.)
- Wipe a thin layer of the soapy water on the area of the mask you want to apply the first section of graphics. If you apply too much water and the graphic is sliding around too much, just wipe it off and start over with a lighter layer. You want the tackiness of the graphic to come through enough to stay in place while you squeegee the bubbles out.
- Place the graphic on the mask and smooth it down with your fingers. As mentioned above, if it's not generally staying in place, it's too wet. Press as much down with your fingers as you can before doing to the squeegee.
- Use the credit card squeegee to press the graphic down. Really rub it on there. Here's my suggestion for wrinkles you can't fix: Just leave them, and after you take the backing off, you can cut the wrinkle with the xacto knife to flatten it and just overlap the excess. You really can't see it. What I recommend against is smooshing the vinyl or trying stretch it. It just doesn't work and will look like crap.
- Now, their instructions say to let them dry before you pull the backing off. I didn't do that, but you probably should. I was too impatient to see it if would work, but I'm here to tell you it does. So once you've applied all the graphics and let them dry, you can peel the backing off carefully. I found that peeling back sharply (but slowly) rather than pulling UP on the paper works better. The flame design (and several others) have lots of pointy edges, so just be sure as you're pulling the paper off that those stay down.
- Trim the excess from around vent holes and edges of the mask with the exacto knife.
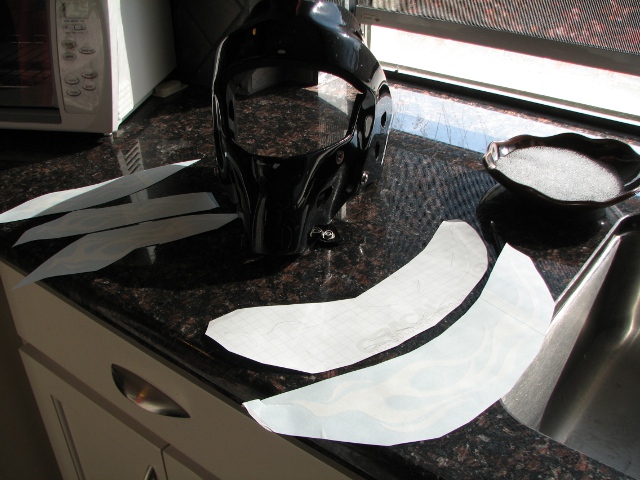
Here are pics. You can click to embiggen them.
 |
| Getting started: 5 decal segments, clean mask, soapy water |
 |
| One of the small graphics with the blue backing peeled off, sticky side exposed. |
 |
| First graphic added |
 |
| All graphics applied |
 |
| Had a hard time getting the chin portion of the graphic to lay down flat and ended up smooshing and tearing it. So I had to patch it with some extra flame bits. Looks fine from a distance but not real swift up close. This is where a simple slice with the exacto would have been the smart thing to do. |
 |
| Final look with paint chips touched up, excess trimmed, and cage back on. |
I'm pretty happy with the final look. I had to improvise after I screwed up one of the big flame graphics, and went asymmetrical, but I like how it turned out. And I like that when I get tired of it or it gets dinged up, I can peel it off and do something else. I figure I'll change it up a couple times a year just for shits and giggles.
There's a 15% discount on right now for InGoal Magazine subscribers through Christmas, so I may pick up another one on the cheap for next time. Also, they'll customize letters or numbers for you. I'm thinking I need "LFB" for my back plate, yeah? Haha... ;)


2 comments:
that's cool.. and I learned a new word: embiggen : )
oh shoot I clicked 'Anonymous'. haha, noob.
Post a Comment